Monday, February 27, 2012

Painting Not Sewing

I went fabric shopping the other day and I've been dying to get some things sewn up. But, we desperately needed to paint our living room. The wall was cracking and what ever kind of paint the landlord used originally rubbed off when ever I tried to clean it. So with two very little children you can only imagine how awful our walls looked.  Now that all the painting is done I'm too sore to sew!

Somehow I ended up doing the bulk of the painting, which I didn't mind at all. My hubby was busy patching cracks and fixing spots before they turned into holes! I don't know why the walls in our living room were in such bad shape. But I think our building must be older than we thought it was.

Here is the process and our new beautiful walls:

Before 

The hubs patching the wall

Can you see the difference in the colors? The new color is soooo much nicer!

The finished product (with toys back in place lol)

I'm just really glad we decided to go through with it. Our living room looks a thousand times better. Now if I can just keep little hands with crayons away from the walls everything will be great.
Pin It!

Friday, February 24, 2012

My First Dress....

So I finished my on a whim dress. It actually didn't come out so great. But for it being my very first one, and my not using a pattern, I think it turned out well. I used an old sheet, and some fabric that I purchased to practice on. Now that I've gone through the whole process I feel confident that I can make a great dress the next time. So here are my mistakes and successes.

I started out by tracing a shirt that fits well. This was mistake one, because the shirt was stretchy and I didn't take my measurements. 


Then I traced a dress that I like the shape of so I could make this dress a similar shape.


Next I cut it out. At this point I was supper excited and I started sewing. But this whole portion was a bust. I couldn't get things to line up properly and the top was way too small. So I decided to scrap this idea. What I ended up doing was cutting the top portion off of this piece.


Armed with a much better idea and new confidence I took a piece of fabric I had and folded it in half then in half again. I then traced a t-shirt on the fold. I added extra room for my measurements. 


Then I drew on a neck line. 


I cut out the neckline and the rest of the top.


The top piece should look like this when you unfold it.


Then I matched up my pieces and sewed them together. 


Next I made facing for the neckline. Again I made a mistake here by not adding an inch or two to the length of the facing. But what I did right was measure the neck line and cut out a piece to fill it. 


Once I cut out the pieces I sewed one of the ends together. Then I folded the fabric length wise and sewed it again. 


The facing was way too big so I cut it down to 1 1/2".


Then I added the facing, hemmed the sleeves and the skirt hem. I had originally added cap sleeves to the dress but it wasn't working and the top was falling in a good position so I took them off and just hemmed it. I ran some elastic through the facing because it wouldn't lay down properly, which actually looked very cute. I also added a bow to the shoulder. I really didn't like how the dress was hanging so I repeated the steps for the facing and added it to the middle portion as a band. When all that was done the dress was too short so I added some material to the bottom to make it longer. 

Sorry I don't have pictures of this portion, at that point I was in the zone lol but the finished product came out like this... 


Happy Sewing! 


Pin It!

Thursday, February 23, 2012

Making Time for Mending: Zippers

Inserting zippers is a necessary skill for any seamstress. When I first tried to insert one I had a really hard time but now it's much easier and since I had a skirt that needed a new zipper I figured why not blog about it. So this is just a quick tutorial of removing and replacing a zipper.

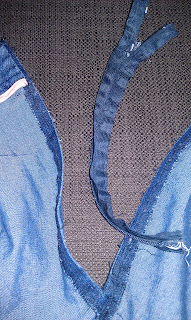
This is the original zipper and as you can see it was ripped and so I couldn't zip this skirt all the way up.

I took a seem ripper and just started to slowly pick at the seams to loosen and remove the zipper.


I then took the new zipper, unzipped it, and pinned it into the skirt. I was careful to make sure that I put it in with as much showing as the one I took out. 


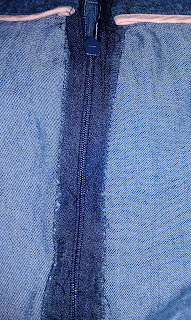
Then I sewed it in removing the pins as I went. I lined up my zipper foot with the zipper teeth to make sure that I wasn't sewing too close to, or too far away from, the teeth. Because sewing too close would prevent the zipper from zipping, and too far away would make it too loose. 


And that's it. It's that simple. Now I have a wearable skirt again! 


Pin It!

Wednesday, February 22, 2012

Food Allergies

I don't have any food allergies. But growing up my little brother was allergic to pretty much everything. For awhile all he ate was meat and french fries. Then slowly he started to eat vegetables. Now (at 18) he can eat most things, but he still can't have any dairy, eggs, seafood, or certain nuts. My mom used to have to cook two dinners. One for him and one for everyone else. I never thought this was weird growing up, it was just our life. Some things were C's food and the other things were all of ours.

Never did I imagine that watching my mom deal with my little brother's allergies would help me deal with my own child's allergies. Our youngest daughter, B, has mild food allergies. I say mild because my brother's allergies landed him in the hospital a few times, but B's allergies just need a dose of Benadryl. So far we know that she is allergic to dairy, peaches, and bananas. Thankfully those things are easy to avoid and making food for her is easy. The hard part is getting her to keep her hands out of everyone else's plate!

Our current plan of action is to just always keep Benadryl on hand and just be very careful. But, I'm still nervous every time she tries a new food or when I'm baking things at the same time. I used to read labels but now I HAVE to read labels. Having a child with allergies totally changes things and makes life more interesting, and scary. In the grand scheme of things though I'd rather deal with mild allergies than any of the other millions of things that could be wrong.

Do any of you have children with allergies? How do you deal with them? Are they mild or severe?
Leave a comment and let me know.
Pin It!

Tuesday, February 21, 2012

Super Quick Skirt!


This tutorial is a project from Brett Bara's book Sewing in a Straight Line. This is her One Hour Skirt, although I don't think it actually took me an hour. It's a pretty straight forward elastic waist skirt. 

First you need to take your measurements and cut your fabric. For this type of skirt you really just need your hip measurements and your measurements for length. In the book the skirt length is above the knee, but I wanted a longer skirt so I cut my fabric a little longer. Your hip measurements will be how wide you need to cut your fabric. 

Once you cut out your pieces you'll stitch them together at the sides using a French Seam


After you have both sides finished it's time to make your elastic casing and hem your skirt. To make an elastic casing you fold your fabric over 1/4"  press then fold again 1/2" (or however much space you will need for your elastic) and top stitch it, leaving a space to thread your elastic. To hem your skirt you just repeat the process but don't leave an opening. 


Now that you've finished the casing and the hem you're pretty much done. Just thread your elastic through, using a safety pin as your "needle".

Then sew the elastic ends together.


Stretch out the skirt to cover up all the elastic, and close your casing opening.


 That's it! Now you have a super cute (and comfy) skirt. 

If you want to see a video of the dress being made HERE is a link of Brett Bara making this project.


Pin It!

Sunday, February 19, 2012

Sewing Skills Sunday

Today I want to share with you all a quick and basic tutorial for getting a more professional looking finish to your projects. Today's sewing skill is... French Seams!

To start out you need to have your two pieces of fabric with the wrong sides together. Like this:

these are scrap pieces I had laying around


Next you need to sew the pieces together with about a 1/4" seam allowance. 


Once you have sewn this seam you need to cut the extra fabric (the small side) down to about 1/8". Be VERY careful not to actually cut the seam. 


Now that you've cut the seam allowance down you need to fold the fabric so that the right sides are facing each other, and press them. Next you will stitch your project together being careful not to sew on top of the excess seam allowance material on the inside.


Now you're all done! You should have clean lines and no raw edges showing. 


Pin It!