Wednesday, April 4, 2012
Update
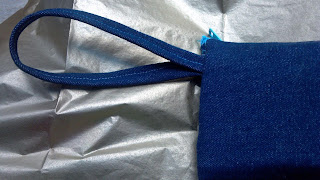
I know I haven't posted in awhile, but I haven't made anything. Actually I take that back I made a wristlet for my little cousin for her 7th birthday. I used french seams to keep the inside looking neat and her name is Leah so I put an L on it to make it more personal. Then added some lip gloss, nail polish, and nail decals. I think she liked it, but she got so many great gifts I'm sure mine will stand out when she needs it to finish an outfit lol.
Other that I've just been busy with my girls. My 3 year old is showing an interest in learning to write her letters so we're doing that and since she's starting to want to "do school" we've been spending a good amount of time daily to work on counting and other fun projects. I'm glad she's starting to want to do these things because when we tried a few months a go she wanted no parts of it. I'm thinking in September we'll be able to really start homeschooling. Yay!
I'm hoping I'll get to start sewing again and post some new tutorials but for right now, life is calling.
Here are pictures of the wristlet I made:

Wednesday, March 28, 2012
Project List
This week I don't have any small projects planned. I'm working on larger projects that take a few days to finish up. I'm almost done with a seersucker dress, I'm working on another top, my mom and I are trying our hand at purse making, I want to make 2-3 more dresses, and I want a few more maxi skirts. The skirts won't take long but they're last on my list. I'm also thinking about making a slip cover for our couch. I think it would be fun to have a lighter color in the spring and summer.
Some of the dress patterns I'm looking at are:
 |
| I love dress A, the one on the top is too hippie for me lol |
Have any of you used these patterns before? what's on your sewing list?

Tuesday, March 27, 2012
My Spring Top Entry
I don't know if you know but, Rae over at Made by Rae is hosting a Spring Top Sewalong! So I've been busy making my entry, which is why I haven't posted in a few days. Now that I'm done I wanted to share my top with you all.
This top is New Look pattern 6104. I love it! I think it came out pretty good considering I am a beginner, and that I had to adjust the neckline. I used a fun stretch cotton fabric that's navy with big white polka dots. Usually I'm a small polka dot kind of gal. But I went fabric and pattern shopping with my mom, and she thought big polka dots would be fun.
I think I'm going to make this shirt again with the seersucker fabric I have. Or I might make one of the other styles.
So what do you think? and are you entering the top contest?

Thursday, March 22, 2012
My "New" Dress Form
The other day my hubby and I were driving around and we passed an antiques store. The store had four dress forms just sitting outside! So my hubby pulled over and I hopped out to see what they were asking for one. Turns out the guy only wanted $20!!! I was so excited. This is what it looked like when I got it.
These measurements are way off from being mine so I had to "plump" it up a little. I took an old pillow and used the stuffing to fill out the form. I was having a hard time with the, um, upper body so I had to use an old bra to help me out lol!
Once it was all stuffed I took some material I had and covered it. Thankfully I had started to make a top out of this knit fabric, but then I changed my mind, so I had the perfect piece already cut and mostly sewn to fit the dress form.
As you can see it's super lumpy! I smoothed everything out and then stitched the bottom shut. Now I don't have to try everything I make on a million times before I'm finished!

Wednesday, March 21, 2012
DIY: Plastic Bag Holder
To start I took two pieces of fabric 8 inches wide and 20 inches long and sewed them right sides together. On one side I left some room at the top so I could create a space to hang it from.
Then I hemmed the edges of those pieces.
Next I stitched a portion of the top closed.
After that I just made an elastic casing, on each side, and added 8 inch elastic pieces. That's it, easy peasy, this whole project took me maybe 10 minutes to complete and now the plastic bags in my kitchen are organized!
I'm linking up at:


Tuesday, March 20, 2012
A Day at The Farm
Now that the weather is getting warmer, and my babies are getting bigger, I've been looking for different places we can visit that are educational and fun. One of the awesome things about living where we do is that if we travel in one direction we can visit big cities and museums; then head in the other direction to visit farms and small towns. We live in a city, but this farm is only like 15 minutes from our house and it was totally free!
 |
| 'B' thought all the animals were just so funny |
 |
| This was a safe distance lol |
 |
| After I took this shot she tried to jump on the chicken! |
Another really cool thing about this farm is how close we were able to get to the animals. We could of literally touched them. We didn't, lol, but we could of. I've never been so close to a cow before in my life. It was awesome. I think the hubs and I had just as much fun as the kids.
 |
| I thought this calf was just the cutest thing! |
Do you have plans for fun and/or educational trips planned for this spring/summer?

Saturday, March 17, 2012
Point and Shoot Camera Neck Strap

I love taking pictures! And if you follow me on twitter (which you should, just click the button with the bird to the right) Then you know that I just got a new 1-hour battery charger for my camera. Usually it takes my camera battery 5 hours to charge! So if I don't prepare ahead of time there is no way I'm getting to take any pictures.
In light of this new camera charger coming I decided to make a neck strap for my camera. The little wrist strap that came with it just doesn't cut it for me. If we're out and I'm chasing down a kid, or pushing someone on a swing, I can't have my camera on my wrist. But a neck strap is perfect for me!
I didn't measure the length I needed for the strap, and then ended up having to take it apart and add an extra piece for length. So measure out the length that's best for you before you cut anything! For me 35 inches was best. Cut two pieces of material 3 inches wide and half the length you measured. Sew those two pieces right sides together along the short side. Then sew it right sides together down the long side.
Turn it right side out.
Take apart the wrist strap that came with your camera.
Cut down the end of your new strap so it can fit inside the plastic piece.
Slide the small string piece that wraps around the little bar on your camera, onto one of the new straps.
Stitch a portion of the small piece of your strap closed. Then pull the stringy piece down and stitch the rest closed. I used a zigzag stitch so that I could sort of "fake a serge" around the edges.
Now thread your strap through the plastic piece, I used a hair pin to pull it through, and attach it to your camera!
What do you think?

Subscribe to:
Posts (Atom)


